Showing posts with label thing 2. Show all posts

Thursday, August 16, 2012

Best Summer Purchase Everrrrr: Part Deux

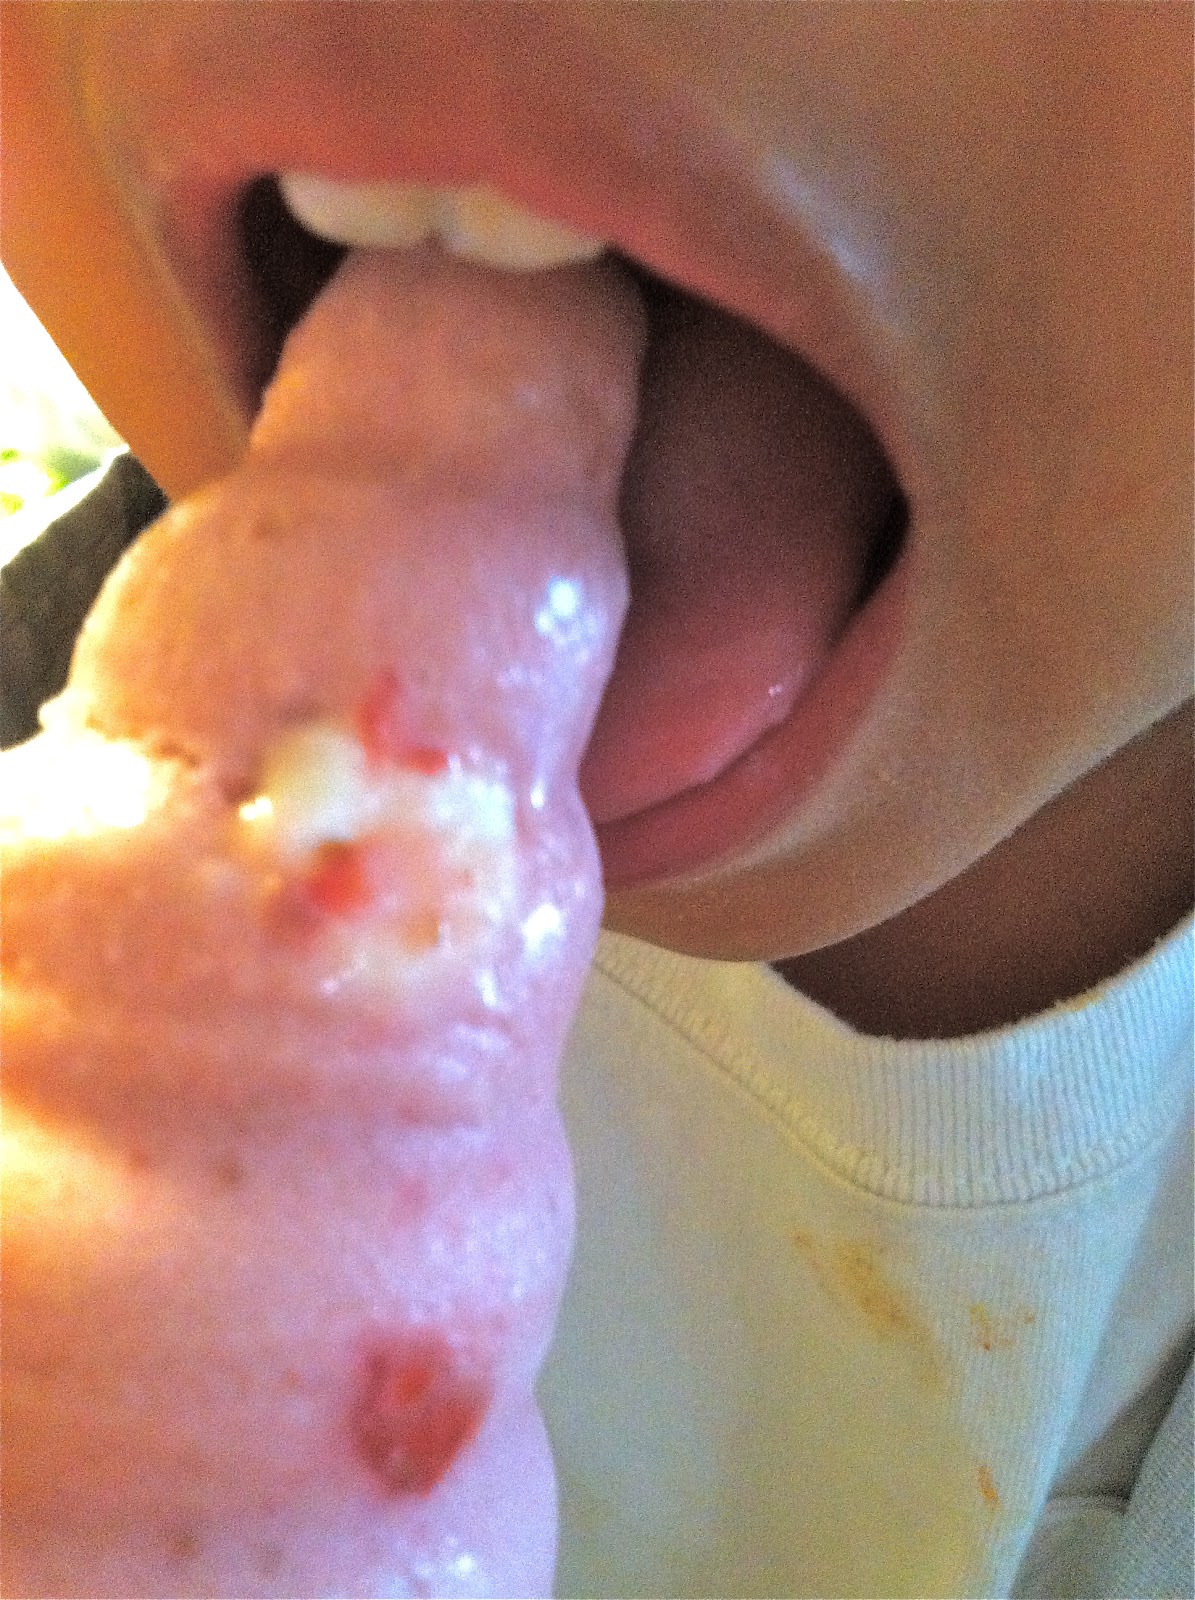
Elias stealing one of his sister's cream pops.

Since I got those popsicle molds, sometimes that's all I wanna do: make popsicles. Unfortunately, most of the time we don't have what I want to make them. Most of the time, I don't wanna follow the rules and directions to do any of it…so I don't. Most of the time, that's ok.

It's been hot here in the East bay for the majority of July and right into mid-August. Triple digit temps. Gross. The only logical thing to do was bust out the handy dandy molds so all of the nuggets in my house could cool off. (Honestly, my crock pot has been doing the rest of the dirty work lately.)

I dubbed these "random crap" pops. Now, I'm very aware that the term "random crap" doesn't sound appetizing. I completely understand that. It's so fitting though. I don't know about your household, but people in my family really like to leave the very end of the carton of milk or the last few chips in the bag. They're freaking pros at it, actually. (My family is also good at leaving empty boxes of cereal, oatmeal packs, etc. in the pantry, too…::ahemThing1ahem::) I'm pretty sure it's their attempt at being considerate, but it actually just ruins my life. Anyway, about the term "random crap": the kids and I threw all of the little leftovers that they always leave…all of the random crap…into the cream pops! This means that each pop is not consistent in what it contains, which completely alters the flavor individually. The one I'm eating will not taste like the one you're eating. That breaks so many rules in the culinary world. Oh well! Thou shall not waste in my damn house.

Best part of these: no processed sugar added. I used raw honey and huckleberry honey!


Strawberry-Mango-Pineapple & Cream Pops
Yield: 8-12, depending on your molds, print recipe

3/4 c. strawberries, frozen
3/4 c. mango, frozen 
1/4 c. pineapple, frozen
1/2 c. cream (or half and half, though they won't be as creamy- that's what I had lyin' around)
1/2 c. ice cream (your choice, what's your flavor?)
1 tsp. vanilla

2 T   honey
2 T   huckleberry honey

Whatever odds and ends food that you find in your kitchen

I threw all of these in our new Ninja Master Prep Blender and let 'er rip. The honey stuck a bit because everything was hella cold, but we can't all be perfect.


What we had left this time.

I made vanilla-cinnamon ice cream the week before with my friend, Becky. We also made apricot jam! That's a whole other post though ;)

The contenders in tonight's Pop Battle

The tools!

Elias put chocolate covered blueberries, cherries, and coconut in his set. He later told me that he didn't even like coconut and didn't want to eat his own creation. Way to go, Kid.

Camryn added some huckleberry honey!

Mixed to a thick consistency, like soft serve.

Camryn said it sounded like someone was SCREAMING!!!!! (For ice cream?) (I had to. Don't judge me.)

Into the freezer we go. 4-6 hours, over night is best.

Things to remember: 

-Tip #1: TASTE! Always taste your food as you go along. If it's not sweet enough, add more honey. If it's not creamy enough, ADD MORE CREAM! Use your dome and your taste buds, they won't steer you wrong.  
Tip #2: Layering. If you throw the bits of coconut or whatever you've got in, the stuff'll sink right to the bottom (which is really the top). Fill molds halfway, freeze for an hour. Add other stuff. Fill to the top. Freeze normally. 
Tip #3: After you've filled your molds, give them a few taps on the counter. Air bubbles will be released and you'll be able to get a few more spoonfuls in there.


Ice Ice Baby,
Thursday, August 2, 2012

Foodie Penpal: What I Sent: From the Bay to LA

So, the way Foodie Penpal works is kinda funny, but very efficient. You sign up, you're paired up with two people: one person you will be receiving a package from, and one person you will be sending a package. In the previous post, I revealed the packaged that I received from Peggy. Now, I'm gonna show you a little of what I sent off to Monique!


Funnily enough, Monique grew up in San Francisco and currently resides in Beverly Hills. I'm from the Bay Area, as you know, and I've worked in Beverly Hills in the past. I knew instantly that Trader Joe's would be out of the question since those are pretty plentiful in California and probably one right down the street from where she lives. (My initial instinct was to hook her up with some Boudin bread, but I knew it wouldn't last, not in my house nor in the mail. It's pretty blasphemous to not eat it fresh, honestly.) A few things about Monique that I learned:


- She's Italian
- She is a baker more than a cook
- No allergies…right on. Not having to worry about killing somebody is always a plus.


Okay, I'll stop talking now. Here's what I sent:


Full contents! L-R: McCauley Olive Grove Corn Nuggets, Skyflakes/Rice Crackers (#1 strawberry basket), Knox Gelatine, Nagaraya BBQ cracker nuts,  Primo's Spinach Dip mix, local honey sticks, and a bonus gift: little melamine spoon measures. :)
Skyflakes: plain crackers, but they're so much more buttery than Saltines. Rice crackers: The perfect combination of sweet, salty, and all Asiany flavors. (Yeah, I said "Asiany", so?)


Contents of basket: Local items like olive oil (from the orchard down the street), Spinach dip mix (from Tracy, CA), local honey sticks, and the bonus gift: melamine measuring spoons!
McCauley Olive Grove Corn Nuggets: Super sweet, but like the note says, "…like a mix between caramel popcorn and corn pops." Sounds like a freaking awesome combination to me. I like these especially because there's not crap stuck in my teeth afterwards. Apparently, she thought they had a garlic flavor to them (oopsies?), but thank God that wasn't the case. That'd been so weird. lol
Gelatin envelopes and a recipe!
Last, but definitely not least: Nagaraya BBQ Cracker nuts
I used berry baskets to contain everything in a neat little package, and twine/index cards to attach my notes. This was really fun to put together, and by the looks of Monique's blog post, she had fun receiving it! 


What a great first Foodie Penpal experience. Can't wait to do it again!


The Lean Green Bean

Tuesday, July 31, 2012

Foodie Penpal! From TX to CA

Apparently, Xenia keeps me in the know about a lot of cool projects: Blogathon Bash was sweet. Now, Foodie Pen-Pals!


This was right up my alley so I joined and was paired up with a lovely lady named Peggy from Kerrville, Texas (I later learned it's about 60 miles northwest of San Antonio). 


The gist of our initial emails were:

- This was our first swap! Noobs! :)
- I'm not allergic to anything, but dislike okra and raw bananas
- I'd love stuff that was local to Kerrville or surrounding areas

Not only was Peggy super sweet and pleasant, but she definitely delivered on the local goods…which obviously, I absolutely loved. She also sent along the cutest letter telling me all about herself, which was SO cool! Peggy is a retired mortician and bereavement educator, and runs numerous newsletters, as well as volunteer. Every email was a pleasure to receive from her and made for an even more enriching Foodie Penpal experience.


Here's the goods:
The contents of my Texas Foodie Penpal Package!
My favorite part: Truffle salt that was bottled in Texas
A recipe to go along with the salt :)
A cute surprise note in the bottom of the bag from Camp Verde General Store
Borracho Beans with Shiner Bock from HEB


Spices of India from Bittersweet Herb Farm


A wooden postcard from the Alamo (No basement…sad!)
Also, Peggy included a Brown Mustard Basil (pictured next to the Spices of India in the package picture) and a spice rub called tale Gator. She was thoughtful enough to include tons of literature on all of the places that she went to compile my package. 

I really appreciated that Peggy took the time to go to a bunch of different locations to come up with the best package she could. Receiving this package was just a friendly reminder that there are still cool people out there in the world. :)

Thanks so much again, Peggy. I told you that I was over-the-moon about my package, and I still am. I will definitely update (all of) you on the fun things I cook with all of my new fun spices and rubs! Can't wait.

Sincerely,


I sent a package out as well, stay tuned to find out what I shipped. Here's what my Foodie Penpal had to say about what I sent her! To find out more about Foodie Penpals or on becoming a Foodie Penpal visit: The Lean Green Bean

Saturday, July 14, 2012

Pin THIS

Ok, I'm not gonna lie. I was not interested in joining Pinterest at all. My first impression was that the idea of it was kind of silly, why couldn't you just bookmark a compelling website on your browser? Then I remembered the whole "social" part of the social media website. Sharing is caring, after all. I think we all share a little too much these days lol. (I say "lol", but I'm actually serious………..lol)


Anyway, since I reluctantly drank the kool-aid, I realized I was dead wrong. It's actually quite brilliant. Yes, you could still just bookmark these pages, but honestly, it's so much more interesting than that.  You freakin' set up your boards (with whatever topics you like), search for friends, and get to pinning. Don't know how to? They have a tutorial for that! You start figuring out how to do things that you didn't even know you wanted to do! Wanna learn how to make your own air freshener? OK! Get rid of hard-water stains? SURE!

Right? I didn't know what I was missing.


Now that I'm in it…I'm in it. I love seeing my friends' pins, and being able to organize all of my pins in one spot. I've already completed a few of DIY projects (which is the main reason I joined in the first place…a friend told me it was a great source for inspiration) that I am going to share with you below. Pinterest is so successful because the platform is so easy to use (as is with Twitter, etc.) It's a cinch to pin and share useful webpages, even though it's slightly flawed in that if many people pin the same one, that's all that shows up for practically the whole page. Albeit it's free, awesome, and I love it. I feel all empowered when I put resourceful information to good use. I think I'm friggin' Rosie the Riveter thanks to becoming a seasoned pinner. (Pinterester? Whatev.)


Most importantly, I've saved a crapton of $$ dollars $$! Obviously, this got me all juiced, and I'm sure Thing 1 will chime in at some point since she always has something to say about saving money. Plus, she and her husband recently purchased an RV- so they are DIYing the shit out of it as we speak. Practically ALL via Pinterest inspiration. They started with the color scheme, and went from there.


I would never consider myself the artsy-fartsy type, but I'm definitely feeling more Monet these days. Check out this painting I did the other day via inspiration from this pin:


I love how this turned out! Not bad, right!? It was a repurposed canvas from one of those wine/canvas events. I hated how mine turned out so I did something about it!
I got lazy with the striping, but I just say it gives it character. BTW, Thoreau is a boss.


I did this with my Rolling Stone magazines, and also issues of National Culinary Review. I was a junior member for a bit and it's a really sick magazine if you're into food. (And who isn't, really?) The inspiration for this came from this pin. I have books for days, too…so the plan is to get them on the wall somehow since I have no room for a bookcase. I also have a hanger for sunglasses as the pin suggests!

I've also upcycled a crappy dresser, my headboard and footboard, and now I actually like looking at my room. It's pretty neat.
Dresser- pin


Headboard/Footboard - pin
I'm not a huge Rolling Stone fan or anything.

I challenge you to go join Pinterest, if you haven't yet. I'll invite you, if you want. Save some money, do it your-damn-self! All it takes is a little elbow grease and a few materials, usually. And time, of course.

What have you pinned lately? Any DIY projects you're working on? Feel free to share in the comments!

Wanna be Pinterest buds? Here's Thing 1 and my links! Let's do this.

Inspired,

Thursday, July 5, 2012

WINNING!

Here are the results of the "Junk in my Trunk" Contest (and how we decided on how we were going to determine the winner):

First off, Thing 1 refused to spin around ten times so that was out of the question. I guess it was kinda dangerous. (Whatev!) So, we ended up going the "pick a name out of a hat" route…I wrote 'em up, Thing 1 picked. We had witnesses: John, Becky, and Al, to make sure we didn't just pick who we wanted to win…I told you that fair is fair and this is serious business! 


The four platforms: Twitter, Facebook, Pinterest, and Blogger.

Twitter, it is! (Can you spot my friend, Al?)

We had 14 followers, mentions, retweets from Twitter. (Kathleen Garber, you're in there! See your name? lol!)

Rob Co (of The Pitcher Plant Project) aka Coy won the junk in my trunk! Here is Thing 1, she is ecstatic. Al apparently lost interest. Douche.
The "x2" was because he got double entries for retweets and following, which obviously doubled his chances, like we said it would. Lesson to all: be aggressive! haha 

Thanks everyone who entered through every social media platform! It was really fun reading your tips and watching you get involved. Much appreciated!

I definitely have more crap lying around so I'll be sure to do another one of these down the line. Stay tuned until then.

Next post from me: PINTEREST!

CONGRATULATIONS COY! 

I'll be in touch with you soon :) 


Monday, June 25, 2012

Blogathon Wrap-Up #blogathon2

The Biannual Blogathon Bash was really fun and interesting!

I wasn't sure about it, since I'm a noob, but everyone was super kind and helpful (especially on Facebook). There was never any pressure to keep up or do more (or anything, really)…which in turn, made me want to do it all. I found some things that were really valuable, and plan to use in the future with all of my writing endeavors.

I dedicated 16-18 hours between June 22 and June 25th. In that time, I did:
  • a few mini-challenges
  • signed up for certain beneficial networks
  • signed up for Rocks and Roses
  • signed up for Foodie Penpal
  • learned how to make a recipe printable (!!!!)
  • entered a couple contests
  • caught up on 1/5 blog posts (3/5 are half-written. I have to send them off to Thing 1 to go collabo on them)
  • and primped the blog a bit! (See: added informational links on Thing 1 and I -------------->
  •  <------------- tweet button, and a few homies -------------->) 
All in all, a very enriching and learning experience, super glad to have had it.


I guess I forgot to add the wrap-up entry, oh well! Done and done!

Thanks again, Kathleen, and Xenia for letting me know about it. Can't wait til the next one :)

Onward and upward,


PS Thanks for the compliments on my handwriting! LOL!

Repurposing Food: Bananas into Chocolate Chip Banana Bread

My niece, Camryn, friggin' loves bananas. Every single time I take her to the grocery store with me, she asks for them. I bought her banana jam from our local orchard and she was ecstatic. She consumes them in any way, shape, or form. What I'm trying to say is, I almost always have a shitload of bananas in my house. Sometimes she eats them all, and sometimes Cam "forgets", or so she says. Whatever.

So, you know I hate wasting food. Currently, we have two bananas that are crazy over ripened and two is not really enough to make anything. I'll end up freezing those two until I come across some more forgotten bananas. Yes, it's okay to freeze certain fruits without any detriment. Nanners are one of them. My favorite thing to make out of bananas is banana bread. Chocolate chip banana bread, to be specific. If I have enough ingredients, I'll make one plain and one with chocolate chips. (How many times do you think I can say "bananas" in one post?)

My bud, Dahlia, of Makita Studio (holla!), mentioned that she made this recipe on instagram one day. I had the ingredients so I decided to try it out. Sidenote: I did not try this specific one out. I almost always end up changing at least half of the ingredients because I either a) don't like 'em or b) don't feel like using them. What's funny is I posted a pic of my finished product to her, said I changed a bunch of stuff, and she said she did, too! Haha!

Here is my adapted recipe:


Chocolate Chip Banana Bread
(Yield: 2 loaves or 24 regular sized muffins)
Print this recipe


  • In the oven, gettin' a tan.
    • 1 cup butter, unsalted and softened
    • 1 1/2 c. brown sugar, packed
    • 1/4 c. honey
    • 2 eggs
    • 2 tablespoons mayonnaise <----WTF? NO.
    • 1 tablespoon vanilla (the real extract, not "vanilla flavoring")
    • 2 tablespoons buttermilk 
    • 6 super ripe bananas (I'm talkin black peel ripened), mashed
    • 2 1/2 cups all-purpose flour
    • 1/4 teaspoon salt
    • 1 teaspoon baking powder
    • 2 teaspoons baking soda
    • 1 cup semi-sweet chocolate chips, or however the hell many you want, optional
    • 1/2 cup chopped walnuts, completely optional (especially since I hate walnuts. Try pecans!)

    • Preheat oven to 350 degrees. Whisk together the flour, salt, baking powder and baking soda in a separate bowl. Set aside.

    • In another large bowl, cream the butter and sugar until light and fluffy. Stir in the eggs one at a time, beating well with each addition. Scrape the sides of the bowl down. Add bananas, buttermilk, and honey. Blend the flour mixture into the banana mixture; stir slowly and just enough to evenly combine. Fold in the chocolate chips and walnuts.
    • Fill loaf pans or muffin tins until 2/3 full. Bake at 350 degrees until golden brown (Tip: or when a toothpick inserted into the center of the loaf comes out clean) about 50 minutes to an hour and fifteen minutes, depending on your oven.

  • Important things to remember:
  • DON'T OVER MIX! You'll end up with rubbery banana bread and that's gross. (If you'd like to know why, ask me in the comments.)

  • Tip: Create an even split top on your banana bread by running a butter knife or a small offset spatula down the center after panning, but prior to baking. Creating the divot will allow the bread to rise evenly. (You'd still end up with a split top if you didn't do this, but you don't know where exactly it will split.) Also, remember to rotate pans mid-bake.

  • Another tip: Don't have buttermilk? Use regular milk and lemon juice. (The ratio is usually 1 oz lemon juice per every 8 oz milk; In this case, you'd want 1 tablespoon 2 teaspoons of buttermilk, 1/2 tsp. lemon juice. Mix together and let sit for a few minutes, then add.) 

  • Cool loaf or muffins in the pan until cool to the touch, move to a wire rack to finish cooling. Serve with honey butter (1/4 c. honey, 2 sticks unsalted butter…whip until combined!) or jam, preserves. Anything your little heart desires.

  • You should come out with something looking like this:

  • or this:
    Chocolate Chip Banana Muffins (atop some rouge velvets that I made for my friend's birthday!) Sorry, I forgot to take a pic before wrapping them up. I was rushing to hop on a plane to Vegas! Oops. Anyway...
    Bon appétit or whatever,